এনআইডি কার্ড ফরেইন মিনিষ্ট্রি করার পদ্ধতি।। How to get FOREIGN MINISTRY ATTESTATION for NID Card New
জাতীয় পরিচয়পত্র ল এবং ফরেন মিনিষ্ট্রি এটেস্টেশন করাতে চাইলে আজকের পর্বটি আপনার জন্য খুবই গুরুত্বপূর্ণ। কারণ আজকের এই শিক্ষামূলক টপিকস এর মাধ্যমে একটি জাতীয় পরিচয়পত্র কিভাবে ল এবং ফরেন মিস্ট্রি সত্যায়ন করবেন সেই বিষয়টি সম্পর্কে জানতে ও শিখতে পারবেন।
লেখক পরিচিতি: আমি আতিকুল খান, আমি যে কাজগুলি করে অর্থ উপার্জন করি সে কাজগুলি আপনাদেরকে শেখানোর উদ্দেশ্যে ভিডিও তৈরি করে আমার ইউটিউব চ্যানেলে এবং এই ওয়েবসাইটে দিয়ে থাকি। আমি সাধারনত ভিডিওর মাধ্যমেই আপনাদের কে এ ধরনের কাজগুলি ভালোভাবে বুঝাতে পারি। লিখে লিখে বুঝাতে ততটা সহজ হয় না। ভিডিওর মাধ্যমে আমার কাজ ফলো করে আপনি নিজের কাজে লাগাতে পারবেন এবং গ্রাহক সেবা দিয়ে আয়ও করতে পারবেন।
ভিডিও দেখে শিখতে চাইলে নিচের ভিডিওর লিংক টিতে ক্লিক করুন।
ভিডিওর কথাগুলি সরাসরি আপনাদের নিকট নিম্নে শেয়ার করলাম। (ভিডিও দেখে শিখতে এবং বুঝতে সহজ, লেখায় বানানগত ভুলত্রুটি থাকতে পারে)
আসসালামু আলাইকুম ভিউয়ার্স, লেটেস্ট ইনফো বিডি ইউটিউব চ্যানেলের পক্ষ থেকে আপনাকে শুভেচ্ছা।
জাতীয় পরিচয়পত্র ল এবং ফরেন মিনিষ্ট্রি এটেস্টেশন করাতে চাইলে এই ভিডিওটি আপনার জন্য খুবই গুরুত্বপূর্ণ। কারণ আজকের এই শিক্ষামূলক ভিডিওটির মাধ্যমে একটি জাতীয় পরিচয়পত্র কিভাবে ল এবং ফরেন মিনিষ্ট্রি সত্যায়ন করবেন সেই বিষয়টি সম্পর্কে জানতে ও শিখতে পারবেন। তাই গুরুত্বপূর্ণ এই ভিডিওটি না টেনে সম্পূর্ণ দেখুন এবং এই ধরনের গুরুত্বপূর্ণ ভিডিও প্রতিনিয়ত পেতে অবশ্যই লেটেস্ট ইনফোডি YouTube চ্যানেলটি সাবস্ক্রাইব করে পাশে থাকা বেল বাটন অন করে রাখুন। কারণ আমি প্রতিনিয়ত আপনাদের জন্য এই ধরনের গুরুত্বপূর্ণ ভিডিও দিয়ে থাকি। বিশেষ করে যাদের কম্পিউটার দোকান, কম্পিউটার টাইপিং সেন্টার, গ্রাহক সেবা দেন তাদের জন্য আমার এই ভিডিওগুলি গুরুত্ব অপরিসীম। কারণ তারা এই ভিডিওগুলি দেখে সরাসরি কাস্টমার সার্ভিসে ব্যবহার করতে পারবেন। এতে করে আপনাদের কোন প্রকার অসুবিধায় পড়তে হবে না। কারণ আমি যে কাজগুলি করে অর্থ উপার্জন করি সেই কাজগুলি সরাসরি আপনাদের শিক্ষণীয় ভিডিও হিসেবে শেয়ার করে থাকি।
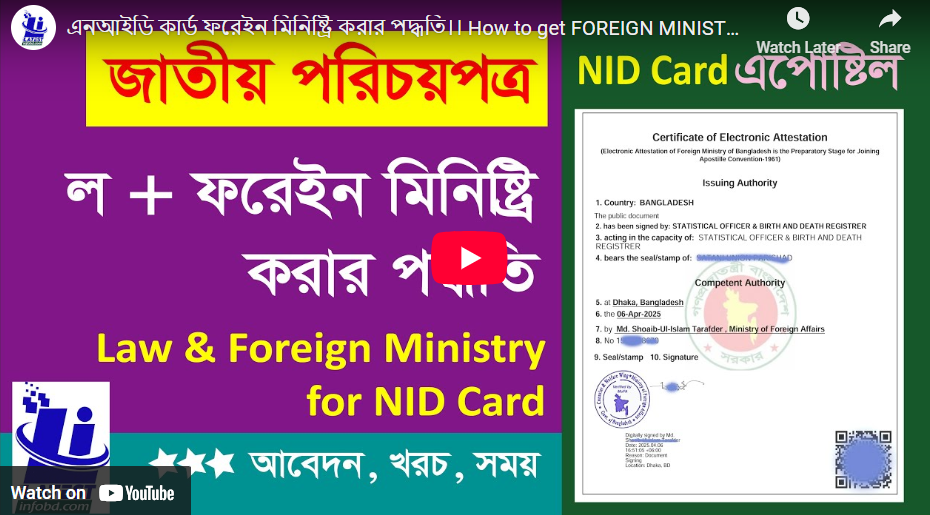
মূল পর্বে চলে যাই। আমরা ইতিমধ্যে জেনে গেছি যে মন্ত্রণালয়ের এটেস্টেশনের জন্য এখন আর সচিবালয়ে যেতে হয় না। ঘরে বসে নির্দিষ্ট নিয়মে অনলাইনের মাধ্যমে আবেদন করলে পাঁচ থেকে সাত দিনের মধ্যে আমরা এ ধরনের একটি অ্যাপোস্টিল সার্টিফিকেট পেয়ে যাই। যেখানে একটি কিউআর কোড থাকে। ওই কিউআর কোডটি স্ক্যান করলে আমরা যেই ডকুমেন্ট দিয়ে এটেস্টেশন করার জন্য আবেদন করেছিলাম সেই ডকুমেন্টটি কিন্তু আমরা পেয়ে যাই। এতে করে টোটাল প্রক্রিয়াটাই কিন্তু সহজ হয়ে গেছে এবং কাঙ্খিত যেই জায়গায় আমাদের এই সার্টিফিকেট চেয়েছে বা যেই জায়গায় আমাদের সার্টিফিকেটটি লাগবে সেখানে জমা দিলে তারাও কিন্তু খুব সহজেই এই কিউআর কোড স্ক্যানের মাধ্যমে আপনার ডকুমেন্ট ভেরিফাই করে নিতে পারবে।
এনআইডি কার্ড ফরেন মিনিষ্ট্রি এবং ল মিনিস্ট্রি করার জন্য আমাদেরকে যে কাজ করতে হবে সর্বপ্রথম আইডি কার্ডের কালার কপি নিয়ে সেটিকে নোটারি করতে হবে। কিভাবে করব? একটি অনুবাদ কেন্দ্রে যেতে হবে। আমি যেখান থেকে করেছি ঢাকা দৈনিক বাংলা মোড় মহানগর অনুবাদ ইসলামিয়া অনুবাদ ঢাকা অনুবাদ এ ধরনের অনুবাদ কেন্দ্রে গিয়ে নোটারি পাবলিক কার্যালয়ের মাধ্যমে একজন এডভোকেট দিয়ে আমি এটেস্টেড করিয়ে নিয়েছি এরপর এই পৃষ্ঠাটিকে স্ক্যান করে নিয়েছি স্ক্যান করার পর এই পেজটিকে আমি 1024 কিলোবাইট এর মধ্যে নিয়েছি এই 1024 কিলোবাইট এর মধ্যে আপনি কিভাবে নিবেন সেটি একটু দেখিয়ে নেই এডব ফটোশপ এর মাধ্যমে এই কাজটি করা যায় খুব সহজেই আমি এটিকে ফটশপে নিলাম। ফাইলে গিয়ে সেভ এস দিলাম। জেপিইজি ফরমেট রাখতে হবে। জেপিজি অথবা পিএনজি অথবা জেপিজি তিনটার যেকোন একটি ফরমেটে রেখে নাম রিনেম করলেন। আমি এই নামে রাখলাম। সেভ বাটনে ক্লিক করলাম। ওকে দিলাম। এরপরে এখানে যে প্রিভিউ টিকটি রয়েছে প্রিভিউ টিকটি অন রাখতে হবে। কারণ আমি কোয়ালিটি কমাবো বাড়াবো। কোয়ালিটি কমানো বাড়ানোর উপর আমি এখানে সাইজ দেখতে পারব কত সাইজ রয়েছে 865 রয়েছে আমি চাইলে কমাইতে পারি দেখুন কমাইলে 786 আসলো আরো কমাইতে পারি আরো কমে গেল 561 আসলো আমি একটু বাড়িয়ে দেই কেন কারণ আমি চাই 1024 কিলোবাইট এর নিচে থাকুক কিন্তু কাছাকাছি থাকুক কারণ আমার আইডি কার্ডের ভিউটা ক্লিয়ার থাকুক রেজুলেশনটা ভালো থাকুক তাই এই কোয়ালিটি লেভেলটি কনফার্ম হওয়ার পর ওকে বাটনে ক্লিক করলেই আমাদের ফাইলটি পুনরায় আরেকবার সেভ হয়ে যাবে। ফটশপ কেটে দিলাম। এখানে যে সেভ হলো সেটির সাইজটি আমরা দেখতেছি 886 কিলোবাইট। 1024 কিলোবাইট এর উপরে যেন না যায়। আর কি নিয়েছি যার এনআইডি কার্ড তার একটি স্বাক্ষর স্ক্যান করে নিয়েছি।
এরপর মাইগভ.বিডি এই ওয়েবসাইটটিতে যেতে হবে। এক ঠিকানায় সরকারি সকল সেবা এই সাইট থেকেই আমরা এই ধরনের সার্ভিসগুলা নিব। বিশেষ করে মন্ত্রণালয়ের এটেস্টেশন গুলি সত্যায়নগুলি আমরা এই সাইটের মাধ্যমেই বর্তমানে করার সুযোগ পেয়েছি। এখান থেকেই আমরা করে নিব। কিভাবে কাজটি করব সেটি আমি এখন দেখাই। নাগরিক লগিনে গিয়ে লগইন করতে হবে আপনাকে। লগইন করার জন্য ইউজার আইডি এবং পাসওয়ার্ড লাগে। এই ইউজার আইডি এবং পাসওয়ার্ড কিভাবে পাবেন? রেজিস্ট্রেশন করুন বাটনে ক্লিক করে মোবাইলে ওটিপি দেওয়ার মাধ্যমে আপনি নতুন পাসওয়ার্ড সেট করে এই ইউজার আইডি এবং পাসওয়ার্ড তৈরি করে নিতে পারবেন। যদি হেল্প লাগে তাহলে লেটেস্ট ইনফোবিডি YouTube চ্যানেলটিতে আপনি এই ভিডিওটি পেয়ে যাবেন। আমি প্রয়োজনে আপনাদেরকে এই একাউন্টটি করার লিংকটি ভিডিও ডেসক্রিপশনে দিয়ে দিব। আমি আমার একাউন্টে প্রবেশ করি।
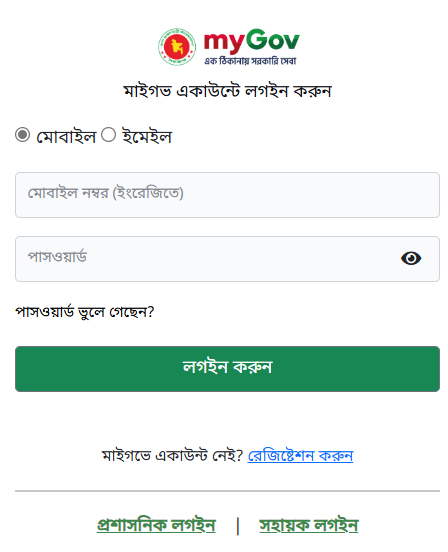
এখানে আমি মোবাইল নাম্বার দিলাম। এরপর পাসওয়ার্ড দিলাম। এরপর লগিন করুন বাটনে ক্লিক করলাম। আমার লগিন সম্পন্ন হয়ে গেল। কিভাবে বুঝলাম? উপরে ডান কোণে দেখুন আমার নামটি চলে এসেছে। এই নামে ক্লিক করলে ড্যাশবোর্ডে যেতে পারি। ড্যাশবোর্ডে কি পাই? সর্বশেষ যে আবেদনগুলি আমার চলমান রয়েছে সেই আবেদনগুলি দেখতে পাই। এখান থেকে বাম পাশে নতুন আবেদনে গেলেও আবার একটু আগে যে পেজে ছিলাম সেই পেজে চলে আসলাম। আমরা যে সেবায় যাব জাতীয় পরিচয়পত্র সত্যায়ন সেবায় যাব। সেটি কোথায় পাব? একটু নিচে এসে বিদেশগামী নাগরিকদের সার্টিফিকেট সত্যায়ন এই লিংকের মাধ্যমে আমি আমাদের কাঙ্খিত সার্ভিসটি খুঁজে নিব। এখান থেকে দেখুন জাতীয় পরিচয়পত্র এনআইডি সত্যায়নের আবেদন এখানে ক্লিক করলেও হবে অথবা একটু ব্যাকে যাই পেছন পাতায় আসলাম। এখানে লিখলেও হবে। দেখুন আমি লিখি বাংলায় লিখতে হবে। জাতীয় পরিচয় এই যে চলে এসেছে। এখানে ক্লিক করলাম। ওই একইভাবে যাওয়া যায়। একই জায়গায় চলে আসলাম। জাতীয় পরিচয়পত্র এনডি সত্যায়নের আবেদন। এখানে ক্লিক করলাম। এরপর এখান থেকে আবেদন করুন বাটনে ক্লিক করতে হবে। তার আগে একটু নির্দেশাব বলে দেখে নেই কি কি লাগবে। এখানে একটি ডকুমেন্টই লাগবে। জাতীয় পরিচয়পত্রের নোটারীকৃত স্ক্যান কপি। যেটি আমি একটু আগে আপনাদের দেখিয়েছি। ফাইলের সাইজ 1 মেগাবাইট। অর্থাৎ 1024 কিলোবাইট এর মধ্যে হতে হবে। ফাইল জেপিইজি, জেপিজি এবং পিএনজি ফরমেট সেটিও আমি দেখিয়েছি। এরপরে একাধিক ডকুমেন্ট হলে প্লাস বাটনে ক্লিক করে করে আপলোড দিতে হবে। সেটি আমি সামনে দেখাবো। এরপর সেবার ফি কত টাকা খরচ হবে বিনামূল্য এক টাকাও খরচ হবে না সময় লাগবে পাঁচ কার্যদিবস অনেক সময় দুই থেকে তিন দিনও আসে আবার একটু বেশিও লাগে এই বিষয় সম্পর্কে আমি আরেকটু বিস্তারিত আপনাদেরকে সামনে বলব আবেদন করুন বাটনে ক্লিক করলাম এরপর প্রাপক অফিস মন্ত্রণালয় অটো দেওয়া আছে বাছাই করুন দ্বিতীয় সাব মেনু থেকে ড্রপডাউন মেনু থেকে আইন ও বিচার বিভাগ এখানে ক্লিক করতে হবে এরপর মন্ত্রণালয় বরাবর আমাদেরকে যে দরখাস্তটি লিখতে হবে সেই দরখাস্তর কিছু রেডি ফরমেট তারা অটোমেটিকলি সেট করে রেখেছে। এখানে কি লিখেছে? বরাবর সচিব, আইন ও বিচার বিভাগ, আইন বিচার ও সংসদ বিষয়ক মন্ত্রণালয় বিষয় জাতীয় পরিচয়পত্র সত্যায়নের জন্য আবেদন।
মহোদয় সবিনয় নিবেদন এই যে বিদেশে ব্যবহারের জন্য আমার নিম্ন বর্ণিত দলিলাদি বা কাগজপত্র সমূহ আপনার দপ্তর হতে সত্যায়ন করা প্রয়োজন। অতএব অনুগ্রহপূর্বক আমার নিম্ন বর্ণিত দলিলাদি বা কাগজপত্র সমূহ সত্যায়ন করার জন্য আপনাকে বিনীত অনুরোধ করছি। এরপর কিছু তথ্যছক রয়েছে যেটি ফিলাপের মাধ্যমে আমাদের আবেদনটি সম্পন্ন হবে। কিভাবে ফিলাপ করব দেখাই আপনাদেরকে। আবেদনকারীর নাম এখানে আতিকুল খান রয়েছে। এটি আমি কেটে দিলাম। এই নাম দুটি আমি কেটে দিলাম। যার নামে এনআইডি কার্ড তার নামটি আমি এখানে লিখবো। এখানে দুইবার ইংরেজি দিলেও কোন অসুবিধা নেই। প্রয়োজনে আপনারা একবার বাংলায় একবার ইংরেজিতে দিয়ে দিবেন। এরপর পিতার নাম। এরপর মাতার নাম। এরপর মোবাইল নাম্বার। এই মোবাইল নম্বরটি আমি কেটে দিলাম। গ্রাহকের নাম্বারটি এখানে দেই। এই নাম্বারটি খুবই গুরুত্বপূর্ণ। কারণ মন্ত্রণালয় এটেস্টেশন হয়ে গেলে এই মোবাইলে এসএমএস এর মাধ্যমে জানানো হবে। এরপর জাতীয় পরিচয়পত্র নম্বর এটি কিন্তু বাধ্যতামূলক দিতে হবে। জন্মনিবন্ধন নম্বর দেয়ার প্রয়োজন নেই। এখানে ইমেইল এড্রেস রয়েছে সেটিও দিতে পারেন। নোটিফিকেশন পাবেন। কিন্তু ম্যান্ডেটরি না। রেডমার্ক নেই। দেখুন রেড স্টার মার্ক এখানে নেই। যেগুলাতে নেই সেগুলা না দিলে কোন অসুবিধা নেই। জাতীয় পরিচয়পত্র নাম্বার যদি আমরা এখানে না দিতাম কোন অসুবিধা হইতো না। কিন্তু যেহেতু জাতীয় পরিচয়পত্র নম্বর এবং জন্মনিবন্ধন নম্বর দুইটি অপশন রয়েছে কমপক্ষে যেকোন একটি দেয়া জরুরি। যদিও তারা লাল স্টার মার্ক দেয়নি তারপরও এটি দিয়ে দিবেন। কারণ এই দেখুন এখানে নির্দেশাবলীতে দেয়া আছে জাতীয় পরিচয়পত্র অথবা জন্মনিবন্ধন নম্বরের যেকোন একটি তথ্য আবেদন ফরমে আবশ্যিকভাবে লিপিবদ্ধ করতে হবে। এখানে লাল স্টার মার্ক দেয়ার প্রয়োজন ছিল। এখানে বলে নাই কিন্তু আমরা এটি দিয়ে দিব। পাসপোর্ট নাম্বার জরুরি না। এরপর জন্ম তারিখটি এখান থেকে দিব। প্রথমে সাল দিতে হয়। এরপরে মাস দিতে হয়। এরপরে দিন দিতে হয়। এরপর ঠিকানা দিতে হয়। গ্রাম ডাকঘর থানা জেলা। প্রথমে আমি গ্রাম দিলাম। এরপরে পোস্ট অফিস। এরপর থানা। এরপর ডিস্ট্রিক্ট। স্থায়ী ঠিকানা দেয়া হয়ে গেল। বর্তমান ঠিকানাও দিলাম। এটি কপি দিলাম। এরপর একটি গুরুত্বপূর্ণ সেকশন আপনাদেরকে ফিলাপ করতে হবে। যিনি সনদ ইস্যু করেছেন। সনদ বলতে এখানে কোনটিকে বুঝাইতেছে? এনআইডি কার্ডটিকে সনদ বলতেছে। এই এনআইডি কার্ডটি কে ইস্যু করেছেন? এটি ইস্যু করেছেন গণপ্রজাতন্ত্রী বাংলাদেশ সরকার। গভ অফ দা পিপলস রিপাবলিক অফ বাংলাদেশ। এই কথাটি ওখানে আমাদেরকে লিখতে হবে। সনদ কে ইস্যু করেছেন? এখানে আমরা লিখবো গভট অফ দা পিপলস রিপাবলিক অফ বাংলাদেশ। এরপর পদবী। তার পদবী কি? যিনি ইস্যু করেছেন বাংলাদেশ সরকারের কোন পদের ব্যক্তি এটি ইস্যু করেছেন নির্বাচন কমিশনার এটি ইস্যু করেছেন ইলেকশন কমিশনার এরপর দপ্তরের নাম ওই দপ্তরের নাম কি ইলেকশন কমিশনার যে ইস্যু করলেন ইলেকশন কমিশন অফ বাংলাদেশ আশা করি আপনারা বুঝতে পেরেছেন। যিনি সনদ ইস্যু করেছেন তার নাম হল গফট অফ দা পিপলস রিপাবলিক অফ বাংলাদেশ। গণপ্রজাতন্ত্রী বাংলাদেশ সরকার এই আইডি কার্ডটি ইস্যু করেছেন। গণপ্রজাতন্ত্রী বাংলাদেশ সরকারের পক্ষে ইলেকশন কমিশনার যার পদবী ইলেকশন কমিশনার তিনি আইডি কার্ডটি ইস্যু করেন এবং তার দপ্তরের নাম কি? ইলেকশন কমিশন অফ বাংলাদেশ। আশা করি আপনারা বুঝতে পেরেছেন। এরপর সাক্ষর, এখানে সাক্ষর দিতে হবে। আপলোড বাটনে ক্লিক করে সাক্ষরটি দিতে হবে। সাক্ষরটি আগে স্ক্যান করে নিয়েছি। সাক্ষ্যটি এখান থেকে যে টেনে এভাবে ঠিক মাঝামাঝি দিবেন। আপনারা ফটশপে কিছু বাড়তি জায়গা রাখবেন। ফটশপে যখন স্ক্যান করবেন সাইড দিয়ে কিছু বাড়তি জায়গা রাখবেন তাহলে এটি সিলেক্ট করতে আপনাদের সুবিধা হবে। ক্রপ বাটনে ক্লিক করলাম। যদি সাক্ষর অসুন্দর হয় এই যে এখানে ক্লিয়ার বাটন রয়েছে ক্লিয়ার বাটনে ক্লিক করে ক্লিয়ার করে আবার আপনারা আপলোড করতে পারবেন। এরপর সংযুক্তি দিতে হবে।
একটু নিচে এসে জাতীয় পরিচয়পত্রের নোটারীকৃত স্ক্যান কপি। যেটা আমি স্ক্যান করে রেখেছি সেটি ইয়েলো বাটনে ক্লিক করে সেই এনআইডি কার্ডের কপিটি আমি দেখিয়ে ওপেন বাটনে ক্লিক করলাম। কয়েক সেকেন্ডের মধ্যে এটি আপলোড সম্পন্ন হয়ে গেল। যদি আপলোড সম্পন্ন না হতো অনেক সময় নিয়ে নিত তাহলে আপনাদেরকে রিফ্রেশ করে পুনরায় আবেদন প্রক্রিয়া শুরু করতে হইতো। কারণ বেশি সময় নিলে অনেক সময় নেটওয়ার্ক ত্রুটির কারণেও এই সমস্যাটি হয়। এরপর আমি কি করব? আবেদনটি দপ্তরে দাখিল করুন বাটনে ক্লিক করব। এরপর এখান থেকে পুরো আবেদনটি আরেকবার চেক করে নিব। চেক করে নিচে এসে আবেদন দাখিল করুন বাটনে আবার ক্লিক করলাম। কয়েক সেকেন্ডের মধ্যে আবেদনটি দাখিল সম্পন্ন হয়ে গেল। আবেদনটি কবে করলাম? আবেদনের তারিখ এখানে নেই। সেবা প্রদানের সম্ভাব্য তারিখ সেটিও কিন্তু এখানে নেই। তাহলে কি করতে হবে? একবার রিফ্রেশ করব। রিলোড করব। পেজটি রিলোড করলাম। এফ5 এ ক্লিক করে অথবা রিলোড বাটনে ক্লিক করে পেজটি আমরা রিলোড করলাম। রিলোড করার সাথে সাথে দেখুন আমাদের আবেদনের তারিখ 23 জুন এবং সেবা প্রদানের সম্ভাব্য তারিখ 30 জুন চলে এসেছে। আবেদনের সর্বশেষ অবস্থায় সংশ্লিষ্ট দপ্তরে প্রেরণ করা হয়েছে। অর্থাৎ আমরা আজকে 23 তারিখে আবেদন করলাম এবং কবে পাব? 30 তারিখে পাব। সম্ভাব্য তারিখ 30 তারিখ বেশিও লাগতে পারে। আট দিন 10 দিন 12 দিনও অনেক সময় লেগে যায়। সময় বেশি হয়ে গেলে কিভাবে পাবেন সে বিষয়ে কিন্তু আমি ভিডিও দিয়েছি যে বেশিদিন হয়ে গেলে কিভাবে দ্রুত পাবেন সেই ভিডিওটি আপনারা দেখে নিবেন এবং এখানে আপডেট আসবে অনুমোদন দেওয়া হলো এই লেখাটি আসলে আমরা এখানে ক্লিক করে আমাদের এপস্টিল সার্টিফিকেট এখানে ক্লিক করলে দেখুন স্টেপগুলো আগাইতেছে আবেদন গৃহীত হয়েছে 23 তারিখ 9 37 মিনিটে এরপরে সংশ্লিষ্ট দপ্তরে প্রেরণ করা হয়েছে এরপরে এখানে স্টেপগুলো আগাইতে থাকবে আমরা অন্য একটি আবেদনে দেখি যেটি অনুমোদিত হয়েছে এইযে এটিতে যাই ক্লিক করলাম দেখুন এই যে স্টেপগুলা আগাইছে এখানে ডাউনলোড বাটন রয়েছে ডাউনলোড বাটনে ক্লিক করলে আমাদের অ্যাপোস্টিল সার্টিফিকেটটি পেয়ে যাব যে এপস্টিল সার্টিফিকেটে একটি কিউআর কোড থাকবে এই কিউআর কোডটি স্ক্যান করলে আমরা যেই ডকুমেন্ট দিয়ে ফরেন মিষ্টির জন্য আবেদন করেছিলাম সেই ডকুমেন্টগুলি কিন্তু দেখাবে একটি করে সবগুলাই দেখাবে।
আশা করি আপনারা মূল বিষয়টি বুঝতে পেরেছেন যে কিভাবে একটি এনআইডি কার্ড ল এবং ফরেন মিনিষ্ট্রি করার জন্য আবেদন করতে হয় টোটাল প্রক্রিয়াটি আমি আপনাদেরকে বুঝাতে সক্ষম হয়েছি। ভিডিওটি কোথাও কোন কিছু বুঝতে অসুবিধা হলে অবশ্যই ভিডিওর কমেন্টে প্রশ্ন করবেন। আমি উত্তর দিব ইনশাআল্লাহ। পাশাপাশি এই ধরনের গুরুত্বপূর্ণ ভিডিও প্রতিনিয়ত পেতে অবশ্যই চ্যানেলটি সাবস্ক্রাইব করে পাশে থাকা বেল বাটন অন করে রাখুন। সুস্থ থাকুন, ভালো থাকুন। পরবর্তী ভিডিও দেখার আমন্ত্রণ জানিয়ে এখানেই শেষ করছি। আল্লাহ হাফেজ।
FOR ENGLISH READERS
If you want to get your National Identity Card Law and Foreign Ministry Attestation done, today’s episode is very important for you. Because through today’s educational topics, you will be able to know and learn about how to get a National Identity Card Law and Foreign Ministry Attestation done.
Author Introduction: I am Atiqul Khan, I make videos to teach you the things I do to earn money and post them on my YouTube channel and this website. I can usually explain such things to you well through videos. It is not that easy to explain them in writing. By following my work through videos, you can use it for your own benefit and also earn money by serving customers.
If you want to learn by watching the video, click on the video link below.
I have shared the words of the video directly with you below. (It is easy to learn and understand by watching the video, there may be spelling errors in the text)
Assalamu Alaikum Viewers, Greetings to you from the Latest Info BD YouTube channel.
If you want to get a National Identity Card Law and Foreign Ministry Attestation done, this video is very important for you. Because through today’s educational video, you can learn and understand how to get a National Identity Card Law and Foreign Ministry Attestation. So, do not skip this important video and to get such important videos regularly, be sure to subscribe to the Latest Infoday YouTube channel and keep the bell button on. Because I constantly provide such important videos for you. Especially for those who provide computer shops, computer typing centers, and customer service, these videos of mine are of immense importance. Because they can use these videos directly in customer service. By doing this, you will not have to face any kind of difficulty. Because I share the work that I earn money by directly sharing it as your educational videos.
Let’s move on to the main part. We have already learned that for the attestation of the ministry, we no longer have to go to the secretariat. If we apply online at home according to certain rules, we get such an apostille certificate within five to seven days. Where there is a QR code. By scanning that QR code, we get the document with which we applied for attestation. This makes the total process easier and if we submit it to the desired place where we want this certificate or where we need the certificate, they will also be able to verify your document very easily by scanning this QR code.
To get NID card from Foreign Ministry and Law Ministry, the first thing we have to do is take a color copy of the ID card and notarize it. How to do it? We have to go to a translation center. From where I did Dhaka Dainik Bangla Mor Mahanagar Translation Islamia Translation Dhaka Translation, I went to such a translation center and got it attested by an advocate through the Notary Public Office. Then I scanned this page. After scanning, I took this page within 1024 kilobytes. I have not shown you how to take this 1024 kilobytes. This work can be done very easily through Adobe Photoshop. I took it in Photoshop. I went to File and saved it. You have to keep the JPEG format. You have to keep the name in any of the three formats, JPG or PNG or JPG. I kept it in this name. I clicked on the save button. I gave it OK. Then the preview tick that is here has to be kept on. Because I will reduce the quality and increase it. On increasing the quality, I can see the size here, how many sizes are there, there are 865, I can reduce it if I want, see if I reduce it, it came out 786, I can reduce it further, it came out 561, why do I increase it a little, because I want it to be below 1024 kilobytes but close because I want the view of my ID card to be clear and the resolution to be good, so after confirming this quality level, when we click on the OK button, our file will be saved again. I cut Photoshop. We see the size of the saved file here is 886 kilobytes. It should not go above 1024 kilobytes. What else did I take? I scanned a signature of the person whose NID card it is.
Then you have to go to the website MyGov.BD. All government services at one address. We will get such services from this site. Especially, we have got the opportunity to do the attestations and verifications of the ministry through this site. We will do it from here. I will now show you how to do it. You have to go to the citizen login and log in. You need a user ID and password to log in. How to get this user ID and password? You can set a new password and create this user ID and password by clicking on the Register button and giving the OTP on your mobile. If you need help, you will find this video on the latest InfoBD YouTube channel. If necessary, I will give you the link to create this account in the video description. I enter my account.
Here I gave my mobile number. Then I gave my password. Then I clicked on the login button. My login is complete. How do I know? Look at the top right corner, my name has come. By clicking on this name, I can go to the dashboard. What do I find on the dashboard? I can see the latest applications that I have running. From here, I go to the new application on the left side, but I am back on the page I was on a little while ago. The service we will go to is the National Identity Card Verification Service. Where can I get it? I will go down a little and find our desired service through this link, Certificate Verification of Citizens Going Abroad. From here, see the application for National Identity Card NID Verification. You can click here or go back a little and come to the back page. You can also write here. See, I have to write in Bengali. National Identity Card has come. I clicked here. You can go in the same way. I came to the same place. Application for National Identity Card ND Verification. I clicked here. Then from here, I have to click on the Apply button. Before that, I will give you a little instruction, so that you can see what is needed. Here you will only need one document. A notarized scan copy of the national identity card. Which I showed you a little while ago. The file size is 1 megabyte. That is, it must be within 1024 kilobytes. I have also shown the file JPEG, JPG and PNG formats. Then, if there are multiple documents, you will have to click on the plus button and upload them. I will show you that later. Then, how much will the service fee cost? Free. It will not cost a single taka. It will take five working days. Sometimes it takes two to three days, and sometimes it takes a little more. I will tell you a little more about this matter. I clicked on the Apply button. Then, select the recipient office, the Ministry, which is automatically given. From the second sub-menu, click on the Law and Justice Department from the drop-down menu. Then, they have automatically set some ready-made formats for the application that we have to write to the ministry. What is written here? Secretary, Law and Justice Department, Ministry of Law, Justice and Parliamentary Affairs, subject: Application for National Identity Card Verification.
Sir, I humbly request you to attest the following documents or papers for use abroad. Therefore, I kindly request you to attest the following documents or papers. Then there are some information tables that will complete our application by filling them. I will show you how to fill them. The name of the applicant is Atiqul Khan here. I have cut this out. I have cut out these two names. I will write the name of the person in whose name the NID card is located here. There is no problem even if you give it in English twice here. If necessary, you can give it once in Bengali and once in English. Then the name of the father. Then the name of the mother. Then the mobile number. I have cut out this mobile number. I am giving the customer’s number here. This number is very important. Because once the ministry attests, it will be notified on this mobile through SMS. Then the National Identity Card number is mandatory. It is not necessary to give the birth registration number. You can also give the email address here. You will get the notification. But it is not mandatory. There is no red mark. Look, the red star mark is not here. There is no problem if you do not give the ones that are not there. If we did not give the national identity card number here, there would be no problem. But since there are two options, national identity card number and birth registration number, it is important to give at least one of them. Even though they did not give the red star mark, they will still give it. Because here, look, the instructions say that either the national identity card or the birth registration number must be recorded in the application form. It was necessary to give a red star mark here. It is not said here but we will give it. Passport number is not necessary. Then we will give the date of birth from here. First we have to give the year. Then we have to give the month. Then we have to give the day. Then we have to give the address. Village Post Office Thana District. First I gave the village. Then the post office. Then the thana. Then the district. The permanent address has been given. I also gave the current address. I gave a copy of it. Then you have to fill up an important section. The one who issued the certificate. What is meant by certificate here? The NID card is called a certificate. Who issued this NID card? It was issued by the Government of the People’s Republic of Bangladesh. Govt of the People’s Republic of Bangladesh. We have to write this there. Who issued the certificate? Here we will write Govt of the People’s Republic of Bangladesh. Then the title. What is his title? The person who issued it, which position in the Bangladesh government did it? The Election Commissioner issued it. The Election Commissioner then named the department. What is the name of that department? The Election Commissioner issued it. The Election Commission of Bangladesh. I hope you understand. The person who issued the certificate is the Government of the People’s Republic of Bangladesh. The Government of the People’s Republic of Bangladesh issued this ID card. On behalf of the Government of the People’s Republic of Bangladesh, the Election Commissioner, whose title is Election Commissioner, issued the ID card and what is the name of his department? Election Commission of Bangladesh. I hope you understand. Then, the signature, you have to sign here. You have to sign by clicking on the upload button. I have scanned the signature earlier. I will draw the testimony from here and give it exactly in the middle like this. You will leave some extra space in Photoshop. When you scan in Photoshop, leave some extra space on the side so that it will be convenient for you to select it. I clicked on the crop button. If the handwriting is ugly, there is a clear button here, you can clear it by clicking on the clear button and upload it again. Come down a little and click on the notarized scan copy of the national identity card. I clicked on the yellow button to show the copy of the NID card that I scanned and clicked on the open button. It was uploaded within a few seconds. If the upload had not been completed, it would have taken a long time, then you would have had to refresh and start the application process again. Because if it takes a long time, this problem often occurs due to network errors. What should I do next? I will click on the submit application to the office button. Then I will check the entire application from here again. After checking, I came down and clicked on the submit application button again. The application was submitted within a few seconds. When did I apply? The application date is not here. The possible date of providing the service is also not here. So what should I do? I will refresh once. I will reload. I reloaded the page. We reloaded the page by clicking F5 or clicking the reload button. As soon as we reloaded, we see that our application date is June 23 and the possible date of service provision is June 30. The latest status of the application has been sent to the concerned department. That is, we applied today on the 23rd and when will we receive it? We will receive it on the 30th. The possible date may be longer than the 30th. Eight days, 10 days, 12 days also take a long time. If the time is too long, how to get it, but I have given a video that you can watch the video and here will be updated. This article is approved. Actually, we click here and click on our Apostille certificate. The steps are progressing. The application was accepted on the 23rd at 9:37. Then it was sent to the concerned department. Then the steps will continue here. We see another application that has been approved. Let’s click on it. See the steps that are progressing. There is a download button here. If we click on the download button, we will get our Apostille certificate. There will be a QR code on the Apostille certificate. If we scan this QR code, the documents with which we applied for foreign sweets will be shown one by one.
I hope you have understood the main point that how to apply for an NID card law and foreign ministry, I have been able to explain the total process to you. If you have any difficulty understanding anything in the video, then definitely ask questions in the comments of the video. I will answer InshaAllah. Also, to get such important videos regularly, be sure to subscribe to the channel and keep the bell button on. Stay healthy, stay well. I am ending here by inviting you to watch the next video. Allah Hafez.
এ ধরনের গুরুত্বপূর্ন ভিডিও দেখতে চাইলে ও পাবলিশ হওয়া মাত্র নোটিফিকেশন পেতে চাইলে আমার ইউটিউব চ্যানেলটি ভিজিট করে সাবস্ক্রাইব করে রাখুন এবং যে কোন বিষয় জানতে চাইলে আমার ভিডিওর কমেন্টস এ প্রশ্ন করলে আমি উত্তর দিবো।
📧 ইমেইল: (1) atikulpm@gmail.com (2) admin@atikul.com
🌐 ওয়েবসাইট: ATIKUL.COM
📱 ফেসবুক: Latest info bd
▶️ ইউটিউব: LATESTINFOBD